How to Bulk Proof – a simple approach
Bulk Proofing often creates the ‘bulk’ of confusion for a baker – beginner or seasoned! In this blog, I will try to dive into the fundamentals of proofing – when, why, how, and most importantly ‘how long’.
What is Proofing?
Proofing is used interchangeably with fermentation. Although the notion is partly correct, fermentation is only an outcome of proofing. Proofing includes – fermentation and dough development (Fig.1).
Fermentation is the process in which yeasts and bacteria (Lactobacillus when dough includes sourdough as leaven) break down (or eat) sugars and starches in the dough, producing carbon dioxide and alcohol as by-products. Also, in the process, protease enzymes break down proteins. This promotes dough extensibility and also produces volatile compounds that enhance the flavors and aroma of the bread. The carbon dioxide produced forms air pockets and the dough increases in volume while transforming from gel to foam.
The other outcome of proofing is dough development. Dough development includes striking a balance between the elasticity and extensibility of the dough. Extensibility and extensibility are vital properties of dough. While extensibility enables the dough to be stretched, extended, and elongated, when force is applied, elasticity is the ability of the dough to regain its original shape after withdrawing the deforming force.

Proofing at room temperature is – bulk proofing and at cold temperature is – cold retardation or cold proofing.
What is Bulk Proofing?
Bulk proofing is the primary proofing step or the first proofing step (in the case of recipes that do not use cold proofing). Like the name signifies, bulk proofing is in ‘bulk’, when a bigger mass of dough is fermenting before shaping. It is a make-or-break step – the dough ferments and develops within this duration. To know when to finish the bulk proofing is the first and biggest step towards an extraordinary bread!
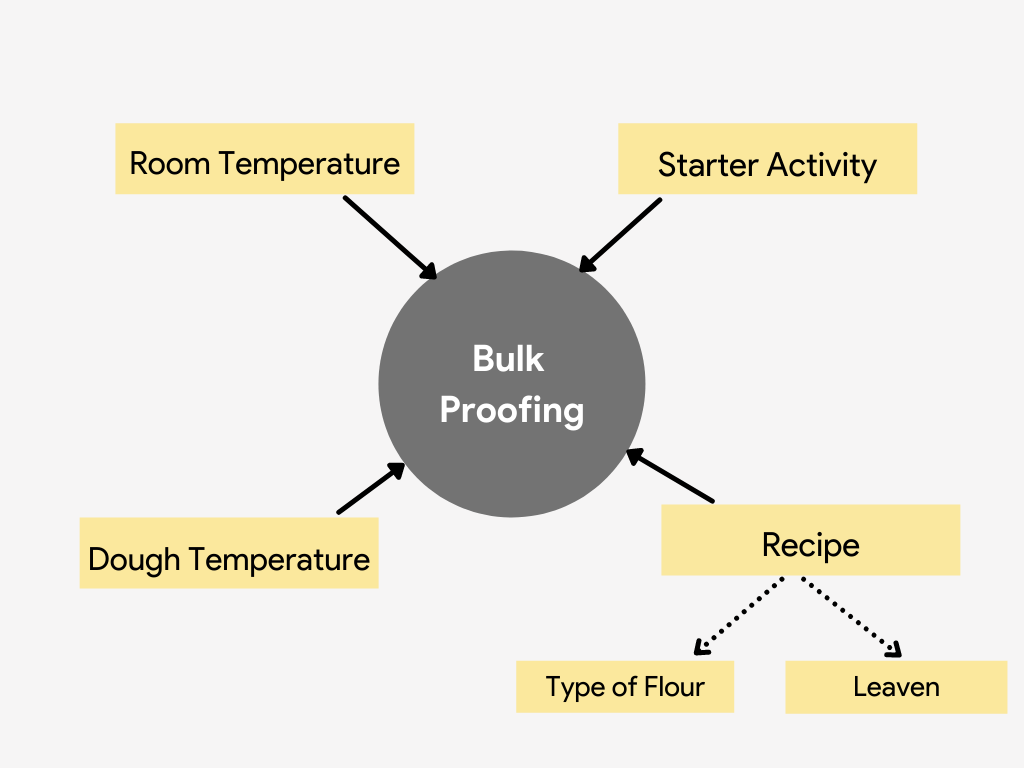
Bulk proofing starts as soon as the mixing of dough with leaven (anything that causes the dough to rise) ends. It continues till the dough is shaped. This duration is variable. Numerous parameters affect the rate of fermentation. This in turn affects the duration of bulk proofing (Fig. 2).
For example – In a typical sourdough bread recipe, I usually bulk proof for about 3.5-4.5 hours depending on the above parameters. However, the bulk proofing for a yeasted bread recipe would normally range between 60-90 minutes.
So, during a bulk proof, fermentation with help of the microbes happens in the background. We have minimal control over this process. However, dough development is completely within our control. This is something we can drive.
You should aim at developing optimum strength into the dough during the coarse of optimum fermentation.
Sounds simple!
But ‘optimum’ is what creates the most troubles. We will address this today. How much is too much and what is just enough ? These are questions like these that we receive almost daily. Quite agreeably, determining the end of bulk proofing initially throws most of us off the track. But, in this post, we will try to observe the changes during the bulk proofing and address how to develop optimum strength in the dough. This will help in better determination of the duration.
Dough Development
The dough develops through the duration of bulk proofing. A dough has visco-elastic properties which means, it has viscosity (tendency to flow) + elasticity (resistance to flow).
Dough development is an inter play between elasticity and extensibility – flow and resistance!
A baker tries to incorporate both properties in a balance. A very elastic dough resists moulding and is stubborn. And a very extensible dough does not hold shape and has a tendency to fall flat. Then again there is not said protocol about how to attain the required balance between the two. This comes from experience and practice.
How to develop a dough?
Dough development is a result of mixing at –
- High speed rigorously – typically in yeasted dough with a much faster fermentation rate.
- Low speeds and intermittent stress induction through the bulk proof- typically in sourdough breads with longer fermentation rate.
There are many kneading techniques – stretch and fold, coil and fold, traditional kneading by hand or in a machine etc. However, the purpose remains same – to stretch and align strands of gluten.
Why do we stretch or coil the dough?
- Developing Strength
- Opportunity to check on the progress of fermentation
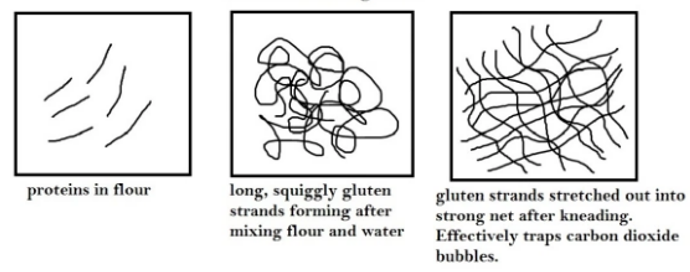
Initially when water is added to flour, gluten network starts to form through very random bonding between water, glutenin and gliadin. These strands of proteins consist of randomly arranged protein threads which are twisted to form loops and knots in an un-extended state. This disorganized structure is very weak, requiring some organization to strengthen it. As the fluid is stirred and over time, it quickly develops into a tangle of fibres as the glutenin proteins form elongated bundles of molecules (Fig.3).
In the course of kneading, due to bidirectional extensions these strands of protein form protein films. Bidirectional extension of gluten pulls apart these knots to plate like forms. Repeated stretches, elongate the gluten, helping to orient the long chains and encourage side by side bonding that contribute to gluten strength. Gradually, the coarse structure of the under- kneaded dough transforms into a more homogenous one, as a great number of strands transform into ‘films’. The number of links between the protein networks of individual flour particles increases during this process (Fig. 3).
In conclusion, we do the coils and/or the stretches to bring – structure and strength to the dough.
How to Stretch and Fold?
Stretch the dough out and over itself from 4 sides, one side at a time, rotating the bowl as you go. While you stretch the dough out, be mindful to extended enough to bring the required strain. But, too much extension may break the dough. As you stretch you get the feel of how much the dough is resisting and count on that to decide the extent of stretch. This depends on the dough hydration, and many other moving parts. So, trust your instinct. Watch the full stretch and fold process (Video 1).
The stretch is followed by a period of relaxation or rest. The duration of the rest varies between 30-45 minutes. This depends on how fast your dough is able to relax. When you stretch your dough, the dough comes together roughly as a ball and when it relaxes, it falls back hugging onto the walls of the container.
Tip – Always have a container of water handy. Wetting your fingers before stretching. This prevent the dough from sticking to your hands. But be careful not to over hydrate the dough.
Folding your dough is like training your muscles – straining and relaxing them alternatively in sets to induce a deformation that eventually helps to build strength.
How to Coil and Fold?
Coil and fold has the same effect on dough as the stretch and fold. It only differs in the way the strain is applied i.e. how the dough is extended. This is my preferred method of folding the dough. Coils work very well with high hydration dough while stretches are more suited for dough with lower hydration.
Wet your fingers sparingly and push them under the dough. And slowly pull the dough unpwards at a right angle, paying attention to the resistance that the dough gives. The pull should cause enough extension to induce the strain required. Repeat this on all four sides and let the dough rest for 30-45 minutes between the coil and folds. Watch the full coil and fold process (video 2).
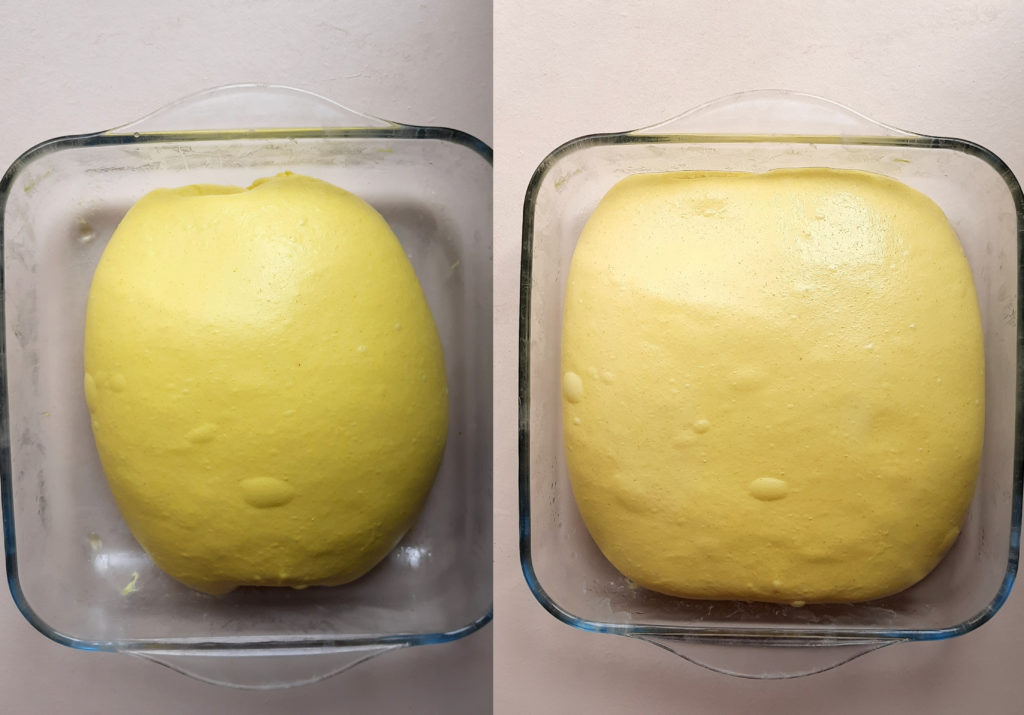
The relaxation between coils and folds follow the same concept and bring the same molecular effects as the stretches and folds. In the picture below, you can see the dough bundled up right after a coil and fold and then the slack dough on the right is after 30 minutes of rest (Fig. 4).
How many sets of folds are needed?
This is a subjective question – cannot be one single correct answer. I usually do 2-4 sets of folds for most sourdough recipes, 3 being my standard approach. However, while performing a set of folds, I try to observe the elasticity and extensibility of the dough. If the dough is very slack and easily extensible, I decide to go for more sets of folds. And, if the dough resists extensions (meaning it was difficult to pull out the dough), I might skip a set of folds.
As the folds are performed to strengthen the dough, I usually observe for the following signs –
- decrease in extensibility
- increase in elasticity
I will then make an intuitive call when to stop and let the dough rest for the rest of the period of bulk proofing.
A well fermented , optimally strong dough bakes an extraordinary bread!
When to end Bulk Proofing?
Finding the exact spot to end bulk proofing takes practice and can be most challenging. Mostly because, there is no definite answer to this. You will need to learn how to read signs of a developed dough – well fermented, balance between elasticity and extensibility, smooth texture, reduced stickiness, notable increase in volume and foamy feeling among few others. In this section, I will explain what I do to estimate the right time to end bulk proofing.
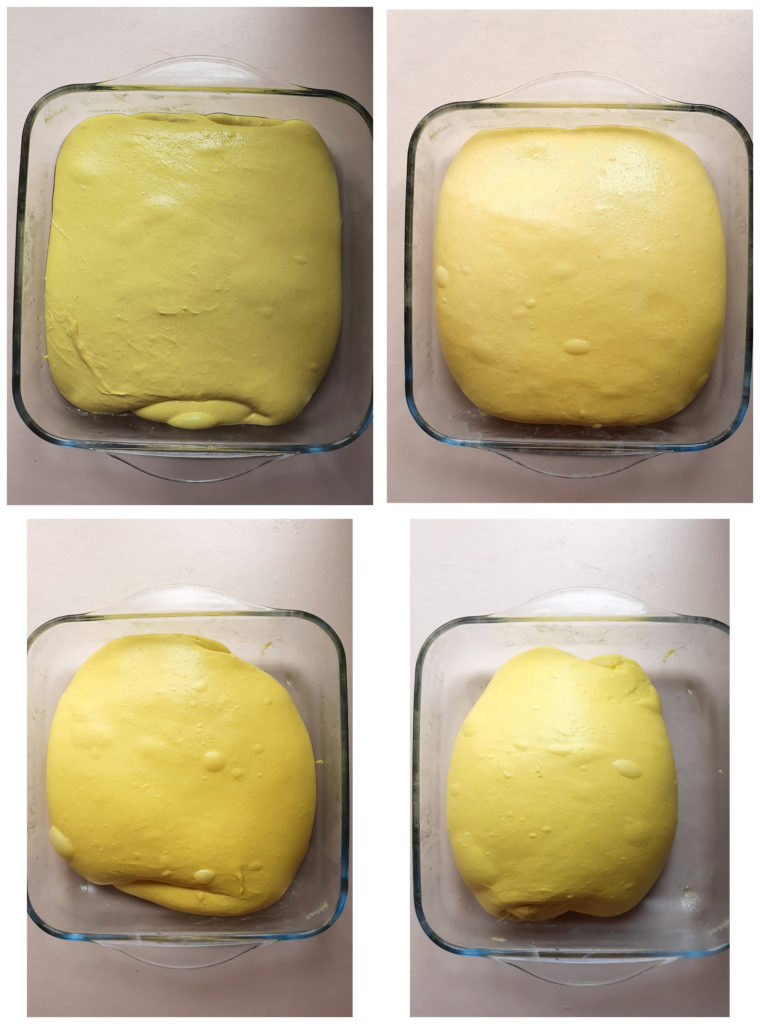
You will notice a gradual shift in the extensibility: elasticity ratio in the dough as you move through the folds. In the first set, the dough seems easy to pull, slightly sticky and very extensible. In the subsequent sets, you will notice a reduction extensibility and a gradual increase in resistance. As the dough approaches the final set, you will notice visible signs of good fermentation – air pockets on the surface, considerable increase in volume and a foamy feel. The dough also does not spread out towards the last set of folds. It almost stays bundled up. These are the ques I look for before ending the bulk proofing (Fig. 5).
Additionally, I also look for a ‘happy’ dough. A happy dough jiggles when the container is shaked!! This is because of the air trapped in little gas pockets throughout the dough. There is a visible shine on the skin and the skin is tight. A watery, sluggy skin indicates over fermentation.
Signs to look out for –
- Increase in volume
- Foamy feeling
- The ‘jiggle’
- Tight and shiny skin
- Holds the bundled shape (almost)
- Clear feeling of resistance when slightly prodded
- Air posckets on surface
- A ‘good’ acidic aroma
- No stickiness
All of these signs indicate that the dough is ready to be divided and shaped.
Tip – I have noticed, it is better to end bulk proof when it is just a tad under proofed. Most times, especially with high hydration and whole grain dough, the fermentation is notoriously fast. The line between under proofed and over proofed is very faint. Stoping a little early, helps in better shaping. The dough has enough strength to undergo the pulling and tugging. Going just a little over might compromise the shaping step.
In Conclusion
Determining the duration of bulk proofing is subjective and comes from repeated practice and keen observation. I have notice an uncanny relationship between starter activity profile and length of bulk proof – you bulk proofing roughly last as long as your starter takes to peak at 1:2:2 feed (+/- 30 minutes). For example – my starter normally peaks 3.5-4.5 hours after a feed of 1:2:2 on most days. This is exactly how long my bulk lasts (on most days)! This gives me an estimate but I do not completely rely on this. I also observe for all the parameter listed above. It might seem like a lot in the beginning but, gradually this will become an intuitive process.
Responses